Wednesday, August 26, 2015

7 Everyday Sewing Tips from Couture Sewing School

I just returned from a blissful week of sewing at Susan Khalje's Couture Sewing School. After 6 1/2 days of sewing all day, every day, I had the hardest time going back to work. I thought I worked in a couture house! What a dream.

I can't recommend the class highly enough. If you have an interest in couture, or just like hand sewing, it's a wonderful investment in your sewing education, and a lovely week of sewing and learning. Susan is an exceptional teacher - she is so relaxed and positive that you'll find you can conquer anything with a needle and thread!

Here's Susan and I when we were doing my first pin fitting. Eeee! This is the best dress ever. Seriously. I can't wait to show you!


So lots of details and photos of the finished project coming soon, but in the meantime, I thought I would share some tips that I learned in the class that apply to any type of sewing.

1. You want your gathers to stand up like little soldiers. 

Getting consistent gathers is tough, and the pattern I was working with had a very full skirt (Are you surprised? It's from the 1950s!). First, you should sew three rows of basting stitches, instead of the typical two. That extra row really helps to firmly hold them in place.

Then distribute them, placing pins at even intervals. Then press the gathers in place. When you press, the gathers should be standing up straight, like little soldiers, rather than all wonky. This last step is a crucial one I had never heard before, and it worked like a dream!

2. Sew from the wide to the narrow. 

I've read bits and pieces about directional sewing before, which is this idea that you should sew like seams the same way every time. I've never been entirely sure about it, but sewing from the wide to the narrow makes perfect sense to me. Susan showed me how much more stretch you'll get on a skirt seam, which can cause rippling, if you start at the narrow and work your way down. 

3. Don't baste in space. 

This was Susan's way of saying that you should put your basting on the table while you're working. It's hard to get the accuracy and control you need when it's sitting in your lap. Things definitely went faster when I moved it to the table! Here I've marked all the seam lines and darts with a basting stitch. As Susan says, "Now you have all the information you need on here to sew." 

4. Two tricks for untwisting thread. 

Have you ever been hand stitching, and your thread starts to get all tangled? This is likely because it got twisted, and you've got two options to fix it. 
  • The next time you insert your needle into the fabric, give it a little twist
  • Let your needle and thread hang off the edge of the table, and it will spin itself back into place. 

5. Thread has a nap. 

This is another reason your thread can get twisted and angry. I had no idea thread had a nap! You should put the end you take off the spool into the needle first to keep it as smooth as possible.

6. Use Beeswax on your thread for stitching that needs extra reinforcement. 

In areas like the hook and eye, snaps, buttons, and the zipper, if you're handstitching them, you'll need a little extra reinforcement. Beeswax helps to do that (mine is from Susan's shop). Just run your thread against the beeswax, and then iron it. Ironing it seals the beeswax to the thread so that it doesn't all come out the minute you put in your first stitch. 


7. Different types of thread should be put on your machine differently. 

I actually learned this one from a woman in the class who works in a Bernina shop. She said that thread that is criss-crossed on the spool, like Gutterman, should be placed on it's side. Thread that runs evenly across the spool, like Coats and Clark, should be placed up and down. Apparently they're designed that way to come off the spool more easily. 


Pretty neat, huh? I always thought couture would be extremely complex, but in reality, it's just the opposite. It's finding the most elegant and practical solution to whatever it is your working on. It's time intensive, to be sure, but the techniques are very simple. I just loved it! 

If you're interested in seeing all my snaps from the week, hop on over to my Instagram account. I tried to document every day in the couture house! 

Wednesday, July 29, 2015

Hand-Embroidered Anna Dress

Oh gollies. This one is good. I've been embroidering away, bit by bit, over the last several months, and the moment I put in the last satin stitch, I boogied my booty to the sewing machine. I  am so glad that I was able to snap photos quickly to show you this one hot off the presses! This is the By Hand London Anna Dress, with the addition of a circle skirt and oodles of hand-embroidered leaves.
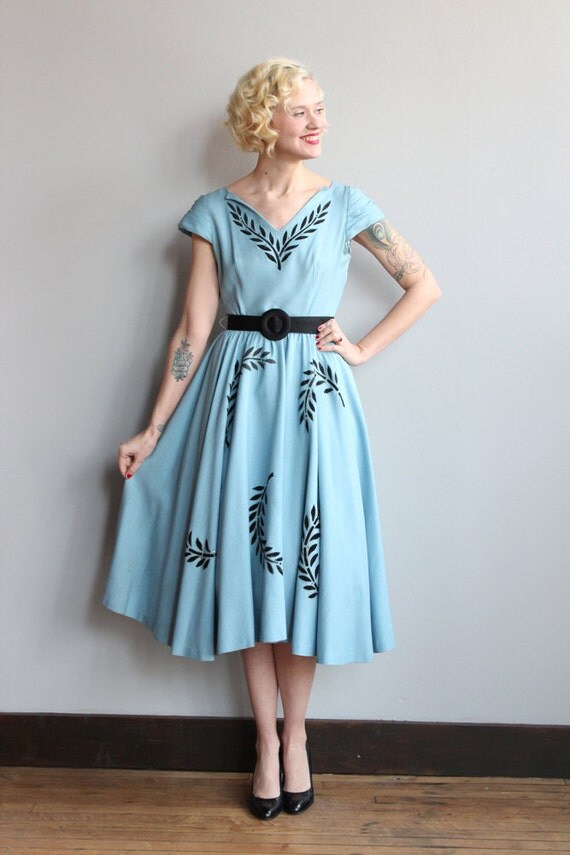
Now, let me back up and tell you the story of how this dress came to be. Upon concluding Me-Made-May this year, I realized I was itching to do another embroidery project on a dress like my cross stitch one. About that time, I happened upon this beautiful dress from Dethrose Vintage. I had also just started working on my first Anna dress, and zing!  I realized I could do a version of this lovely dress, but in my size, with the Anna v-neck. 
Falling Fern Dress on Dethrose Vintage
The original appears to be painted, but my medium of choice is always needle and thread, so I stocked up on black embroidery floss and put on some Netflix. I cut out my dress pattern pieces then free-hand drew the branches. Then I created a leaf pattern piece to trace around for the leaves. I backed each section in interfacing, and then used three strands of floss with the satin stitch for the actual embroidery. 
Once I finished the embroidery, I checked each piece against my pattern to see if it stretched out and I needed to adjust. Of course it had, and I was able to sort out most of it except for a wee bit of gaping on the neckline I couldn't control without throwing things wonky. Next time, I'll definitely do the embroidery on the fabric raw before cutting. 

I constructed the dress, per the instructions, and added a full lining in cotton voile to hide the big blocks of interfacing on the inside. My outer fabric is cotton linen chambray (so many good words all strung together!) by Robert Kaufman. Even with the addition of the lining, the linen and voile are so light and airy that this dress feels nice and cool. 
It turned out smashingly! My next big adventure is the Susan Khalje Couture Sewing School, a week-long workshop where you bring your own special project. I've got some beautiful cotton organdy and a Grace Kelly-inspired cocktail dress that I've been saving up for the occasion. I can't wait, but boy oh boy, that's going to be an undertaking! 

Wednesday, July 15, 2015

Sari Dress

This is very special occasion sewing, indeed. My friend Krupa is getting married later this month, and it promises to be a spectacular, multi-day Indian wedding. Another dear friend gave me this beautiful sari from India a little while back, and I just knew it had to be one of the dresses I wore for the weekend. After attempting to hunt for a suitable vintage pattern for months with no luck, I finally decided to draft something up myself. I wanted a dress where the sari was the star of the show, and I think I've done it!
As I'm sure you can see, I chose the border print part of the sari for the skirt. I gathered it so that I could use it exactly as is, without having to do any additional hemming. For the bodice, I used the heavily embroidered section of the sari. I loved the neckline from the wiggle dress I made last November and decided to use that as my guide. It's a lovely boatneck in the front and deep V in the back, perfect to show off the gorgeous print.
I originally had much different ideas for construction. I had planned to underline the bodice, but I found that it sewed fairly well on its own. I used a size 10 needle for the entire time, and just took it very slowly, test stitching on scraps before I attempted anything with the finished fabric. I ended up lining the bodice in a cranberry silk sateen. It feels lovely! 
For the skirt, I thought I would need a lining, but realized it was completely opaque once I got it constructed, so I skipped that step. This section of the sari gathered wonderfully, but didn't take to seams particularly well. It bunched a bit, something a steam iron would normally press out, but I was concerned that high heat would melt it. I used a lower heat and a press cloth, which worked OK.  

The interesting, and wonderfully delightful, part about the sari was each piece felt and sewed so differently. The bodice felt like sewing a brocade, but the skirt felt more like some sort of nylon. It was a thrill to work on, and I can't wait to wear it to the big event! 

Wednesday, July 1, 2015

Polka Dot Alder Shirtdress

I'm on a polka dot roll! This is the dress that Me-Made May made. I saw so many adorable versions of the Alder during Me-Made May, that I promptly ordered a pattern and got to work. I wanted to get to work so quickly, in fact, that I skipped over a muslin and went straight to fashion fabric. Adventure!
This dress has such a cute shape to it and is a great summer shirtdress. I thought I would find the flat front paired with the gathers to be a bit silly, but in the end, it makes for a really nice silhouette. It's also distinctive from other shirtdress patterns for that reason, and I appreciate a twist on an old favorite. And pockets!
The fit turned out well, despite my devil-may-care approach to it. I only checked my sloper against the pattern before starting to make sure it'd be big enough and the length would work for my shorty torso. The dart placement even ended up being in the right place! I did noticed a little gaping at the bust, although it feels like I've got enough room there. Might be button placement, though. 

I made one change on the fly - the dress is intended to be a loosely fitted shirtdress, but I found it to be a little too loose. I ended up taking out 2.5" of ease at the back bodice only, at the side seams. I've still got plenty of ease left over. I did notice some pooling at my back in these photos, so I'm wondering if I might also need a small swayback adjustment. Or perhaps taking the ease out at the side seam only, instead of evenly distributed across the back waist, created a problem? What do you think? 
Minus that minor hiccup, there's lots of great little details in the construction of the Alder that you can see when you get up close. 
Oh, so cute! 

I do have three tips for you if you're going to make this pattern: 
  • Take care to cut the right front off where indicated on the pattern. I forgot to do this when cutting out the pattern, and it doesn't come up again in the instructions when you do the button band. Consequently, I puzzled over the extra couple of inches on my right front for a few days before I got unstuck. 
  • Baste the two yokes at the armhole before you attach the bias binding. This is in the instructions, but I believe it is referred to as basting the "shoulder edges" (step 7B). I missed this step and consequently didn't catch a layer in some spots. It wouldn't have been a problem if I'd have noticed right away, but I clipped and discovered it until I went to understitch. 
  • Follow the sew along on the Grainline Studio blog. I found the button bands and the corner where you attach the gathered skirt front to be challenging just following the instructions. 
Happy sewing!

Wednesday, June 17, 2015

Polka Dot Rayon Anna Dress

Well, hello Anna! I'm late to join the party on this pattern, and like the Elisalex I sewed last year, this one took me by surprise. Both of these By Hand London patterns are very different silhouettes than I usually sew, and both turned out to be quite handsome dresses. This one is made out of a polka dot rayon that gives it a great swish in the multi-panel skirt.
The construction was very straightforward, and I had to make minimal fit changes. Although, like my Elisalex, I found I was a different size in the front than in the back! The side seam should sit directly below the center of your armpit, effectively cutting you in half. I needed to shift it backward a little bit to sit in the right place, so I ended up with a slightly smaller back bodice piece than the front. I went through a similar exercise when I had the 2014 great fitting trials of the Cambie. Thanks to that episode, I can easily spot the problem now.
I did french seams as the finish, which worked really well with this rayon. The only trouble I had is that it's a little bulky at the waist seam and at the shoulder seam where I hemmed the sleeve. I did do a serged seam just at the edges of the zip, and then went back to a french seam under that. 
I hand-tacked down the facings to make sure they wouldn't budge on me. I also did a hook-and-eye, as the instructions called for, on the zipper. I don't particularly care for a  hook-and-eye at the top of a dress zip, though. I find I don't really need it to get the dress zipped up, and taking it clean to the top makes for such a nice finish. 

But, oh, look at those french seams! They're just beautiful! Worth stitching every seam twice, at least on this little number.
My favorite part about the Anna is those pleats instead of darts at the bust. It softens the bodice and still does a nice job of accentuating the bust. I like it so much that I've already started on a second one! I had such an itch after Me-Made May to do another embroidery project, that I decided to do an Anna Dress with a leaf embroidery detail. It may take me until the leaves fall in autumn to get it all done by hand, but I'm hoping it will be spectacular when I finish! 

Wednesday, June 3, 2015

Me-Made May 2015 Part 2

Another Me-Made May has passed, and as with last year, I find I am more eager than usual to sit down at my sewing machine. Seeing everyone's wonderful creations each day really gets my fingers twitching to stitch. Here's my daily outfit for the second half of the month.
New Look 6587 in Kelly Rosebud
Sewing Wiksten Tank
Button-Down Cambie
Home Sewing is Easy Emery (wink!)
Navy Gabardine Circle Skirt and Coco Tee
Hand-embroidered Simplicity 2195
Cotton + Steel Border Print Shirtwaist
"Sultry" Sundress
Scooter Dirndl
Wearing History 1940s Overalls
Butterick 8404
Elisalex
Cross-stitched Simplicity 1873 
Simplicity 3833
Cat Eye Dirndl (newly made, unblogged)
Striped Hallettsville Shirtwaist
You'll notice, as last year, that Oxford is completely worn out from all the selfies by the time we got to the end of the month. He's really going to have to get more stamina. 

Like New Years, Me-Made May is a nice reset button for my sewing. A chance to make new plans and feel like you're starting fresh. I step into June feeling invigorated to actually tackle some mending/altering on some things I dearly wanted to wear, but that need a little fixing. I also realized I really should do another embroidery project, so I got to work on that, too. I enjoy them tremendously, and the ones I've made are some of my most prized handmade garments. 

I'm also very grateful that there isn't a Me-Made November or February, because I'd be stuck. It's only cold a few months out of the year here in Austin, and not even that cold at that, so it's rare that I sew something for those chilly days. I'm determined to start earlier on those projects this year! 

Cheers!