Tuesday, December 31, 2013

Shift Dress Sew Along: Inspiration

Our inspiration for the Shift Dress Sew Along comes from Catherine of Sewing the 60s. I love the creativity she expresses with each shift she sews, so I knew she'd be a perfect person for this post! Enjoy! 

Hello everyone! It's Catherine here from Sewingthe60s - a blog dedicated to sewing and all things 60s especially the fashion! The wonderful Lauren of Rosie Wednesday has kindly invited me to join in her shift dress sew along and also to shed some light on this simple yet striking style of dress.

At the beginning of the decade shirtwaist and 'wiggle' dresses were the styles most worn by women, but as the 60s drew on, waistlines became looser and looser until around 1963 when shift dress patterns became available to home sewers. This was largely through the work of designers like Mary Quant and Jean Muir.

Mary Quant in one of her own shift dress designs
Celia Birtwell, textile designer, and Cathy McGowan, British journalist, in Biba shift dresses

They, among others, continued to drive its simple beauty by using different colours, patterned fabrics, adding applique shapes and ruffles and changing up the sleeve style. By the late 60s the shift dress was still popular with most women especially those who worked, as the style is modest while still allowing for personalization with scarves, brooches and jackets.


Shift dresses were initially popular due to their simplicity - some darts around the bust and shoulders are all that is needed to fit the shape. The dress then hangs from the shoulders down to just above the knees. The pattern itself is so simple that it's very easy to modify and add to it. Shift dresses are a favourite still today, perhaps due to their simple shape and wearability across all body types!


I own a few shift dress patterns and have one that I've modified enough that it always fits perfectly! Here are some examples:


Be sure the check out the shift dress inspiration board on Pinterest for more ideas!

Friday, December 27, 2013

Making the Marfa Dress

A reader suggested I share a bit of the process getting to The Marfa Dress, and I thought that sounded like a splendid idea! I'll focus mostly on the darts at the neckline, as they're the focal point of the dress. I only wish you could see them a little better in the photos!


Inspiration

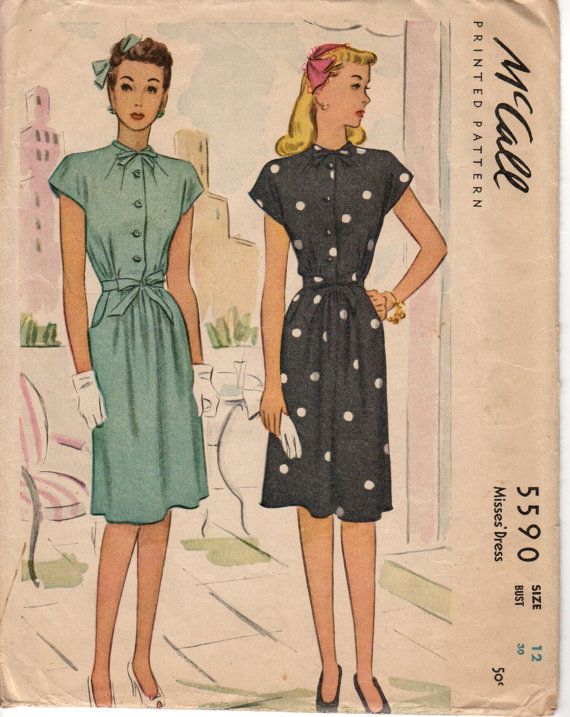
I scoured the web for tons of images and ideas, but the main inspiration for this dress comes down to just 2. The first is from a 1940s vintage pattern, McCalls 5590. It has 4 darts on the neckline.

Source
Angie from Sew I Thought actually made up a beautiful version of the dress on the right for Sew for Victory.

Source
The second inspiration was from an illustration from Make Your Own Dress Patterns by Adele Margolis

Fig 65

I loved the idea of darts coming off the neckline, and experimenting a bit with 1940s styles. Since my first design was a shirtwaist dress, and a good everyday staple, I also wanted something a little fancier for my second design.

Manipulating the Darts

I decided that I wanted 6 darts coming off the neckline, and I wanted them all to be of equal length. I also wanted to keep the bodice cut on center front, so my darts would need to be on either side of CF. I began with my bodice sloper, and then moved and separated the dart from the waist up to the neckline. It looks like this from start to finish:


Here are the steps: 
  1. Redraw new dart legs that go all the way to the bust apex. 
  2. Draw 3 points on the neckline where you want the darts to end up. 
  3. Draw lines connecting the tip of the dart to those 3 points. 
  4. Cut out the dart at the waist, and cut along each of the 3 lines. 
  5. Close up the dart at the waist. Evenly distribute the open space across the 3 new darts.
Ta da!

Perfecting the Darts 

Now that I had the darts manipulated, I had to figure out the best way to sew them. Typically you move the darts about 1" away from the bust apex, so I started there. Because I had 3 darts, I had a bit of excess fabric that pooled at the end that was more than just adding fullness for my bust. Not very flattering! In the end, I made it work by: 
  1. Moving the darts up 2 1/2" above the bust apex. 
  2. Lessening the angle at the dart tip. I started tapering very close to the tip of the dart about 1/2" before it ended. 
Getting to that point was just trial and error over many different muslin versions. I was a pro at sewing those darts by the end!

I hope you all had a smashing Christmas! Next week, we get started on the Shift Dress Sew Along with a bit of inspiration!

Sunday, December 22, 2013

The Marfa Dress

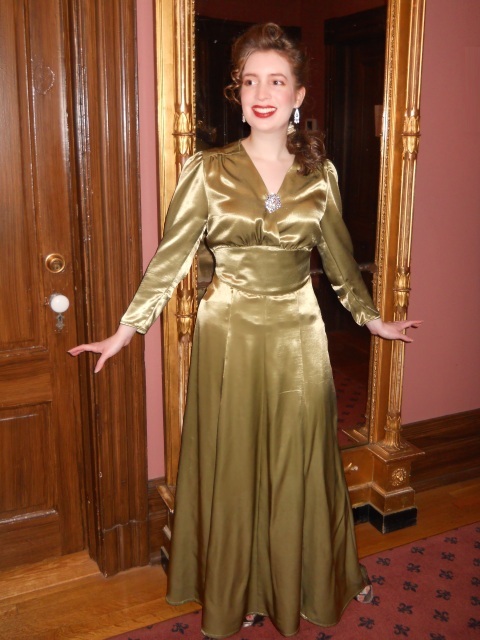
The Marfa Dress is my second dress design, so named after the small Texas town with mysterious lights. I made it from a beautiful emerald crepe rayon and lined it in grey bemberg. I feel so glamorous in this frock!


Dress Details

I stayed very true to my original sketch of the dress. The dress features:
  • Six darts at the neckline. 
  • A cap sleeve.
  • A very full skirt, great for twirling! 
  • A lapped zipper. 
  • Lined bodice. 
Oh, those darts were a bugger to figure out! I had 4 versions of the muslin to test the pattern, and it was largely due to those darts. I had a pool of fabric at the end of them, and it took me awhile to sort out how to remove it. I ended up moving the darts 2 1/2" above the bust apex and then tapering ever so slightly about 1/2" above the dart tip.


I also started out with a skirt that was much more a-line. As soon as I tried it on, I said, "FULLER!" So I added 24" of fullness. I'm not kidding around when it comes to a full skirt. How else would I be able to twirl, like so? 


I am really proud of my lapped zipper, which is the best I've ever done. I followed a technique I'll be sharing with you in the Shift Dress Sew Along

The Marfa Dress at My Fashion Show 

My pattern making class had a final exhibition/fashion show where we walked the runway and showed off our designs. It was so wonderful, and a bit nerve-wracking!

Here's a video of me walking the catwalk in the Marfa Dress! You'll hear a bit of a secret, that won't be so secret now, about a dream I have in the future. You'll also see me chuckle and make some faces as I'm up on the platform - it was a long time to stand up there and twirl and pose! Except now I see it was only 48 seconds… Hrm.


I hope you all have a very merry Christmas!

Wednesday, December 18, 2013

Announcing the Shift Dress Sew Along


Are you ready to make a shift dress together? Let's sew Simplicity 3833, a great 1960s pattern reprint!

If you've been following along for a little while, I posed the idea of a shift dress sew along back in October when I finished sewing Simplicity 3833 for the second time. I love the pattern because it's a shapely shift dress, and a great look for us curvier gals that still want a 1960s vibe.

Skill Level 

I would classify this pattern as an Advanced Beginner. You should know the basics of using your machine. It would help if you've sewn a garment before as I won't be covering things like how to place fabric on grain or read the pattern markings like notches. But I'm happy to answer any questions!

Need a little help getting to advanced beginner? These resources are free online and great: 

Schedule 

Get Your Badge!

Copy/paste the code below onto your blog sidebar or in a post to let others know you're participating in the Shift Dress Sew Along! 

250 x250:


150 x 150:


Join the Flickr Group

I've set up a Flickr group where you can share progress photos, get help from me and others with fitting, and show off your finished dress! Join the Flickr group. 

I hope you'll join us for the Shift Dress Sew Along!

Video produced by Amanda Glaeser, Badge designed by Michelle McCoy

Wednesday, December 11, 2013

Sewing Hollywood History: Holiday Inn

Holiday Inn is a 1942 film featuring Bing Crosby and Fred Astaire with costume design by Edith Head. That's a lot of names I really like. The song "White Christmas" came from this movie, and was so popular that they went on to make the movie White Christmas. There's all sorts of holidays mixed into this one, not just Christmas!

Source

"Easter Parade" Shirtwaist Dress 

Linda Mason , played by Marjorie Reynolds, is Bing Crosby's partner at the Inn, and Fred Astaire is trying to snatch her away. This scene features the song "Easter Parade" and a lot of love triangle tension. As you already know, I'm a sucker for a shirtwaist dress, and this film gave me a great chance to explore 1940s shirtwaist patterns! 


Here are some vintage patterns in a similar style: 

1. McCalls 5184, 2. Butterick 2487, 3. Simplicity 4696

"Be Careful, It's my Heart" Evening Dress 

The next dress is quite fancy, with a sheer yoke and sleeves and sweetheart neckline.  


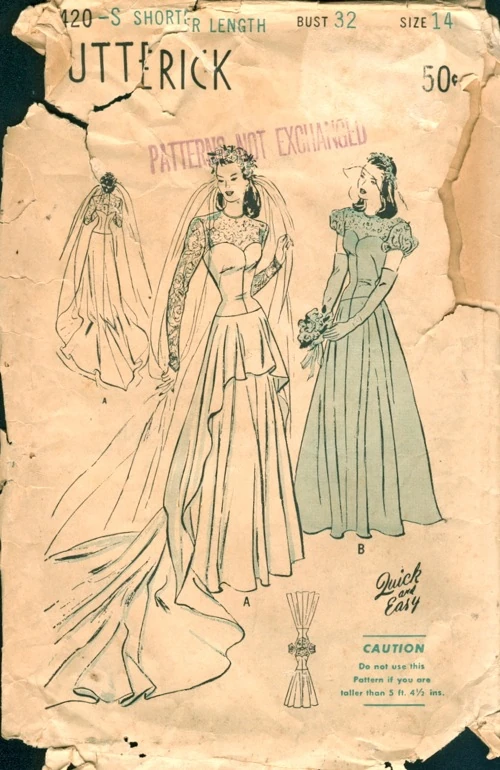
This one was hard to find! I discovered one similar vintage pattern, a wedding dress: 

Butterick 4420

New Year's Eve Gown

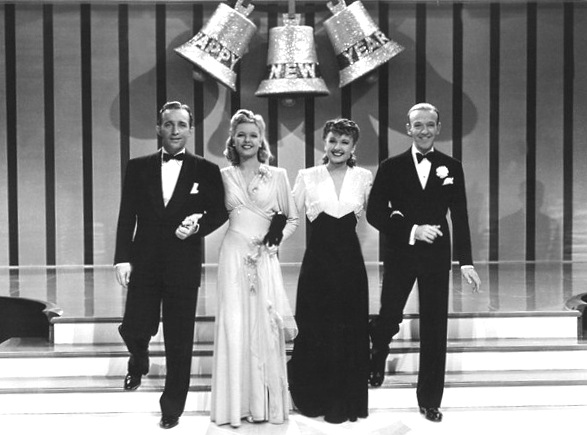
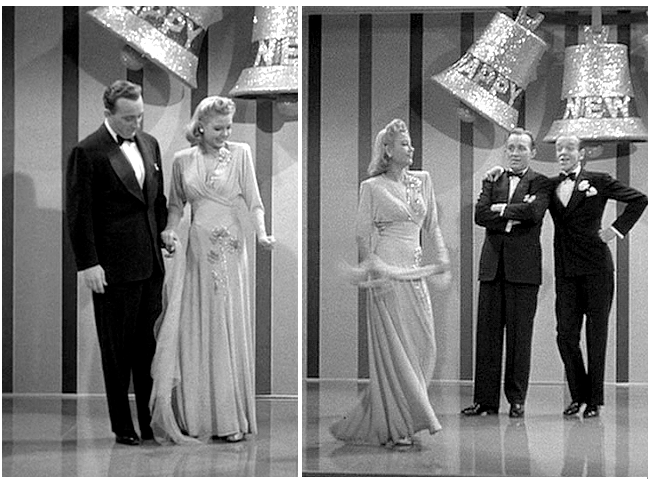
The final scene of the film features the whole gang performing a New Year's Eve number at the Holiday Inn.

Source
Source
I was delighted to discover that Katrina of Edelweiss Patterns sewed this dress from Sense and Sensibility's Swing Dress pattern at the start of this year! 

Source
Source
That's sewing Hollywood history coming to life! I love it!

Wednesday, December 4, 2013

1950s Sock Hop Party

My birthday was Monday, so this week I'm sharing with you my favorite birthday party ever, a 1950s sock hop from last year. I've included links to tutorials and my inspiration in each section so you can recreate it if you like. So let's go to the hop, oh baby!

The Poodle Skirts

My sister-in-law shares the same birthday, and I knew a sock hop birthday party would have to begin with sensational poodle skirts for both of us. 


My Telephone Poodle Skirt

My poodle skirt is a circle skirt made out of felt. I used the telephone applique template from Tuppence Ha'Penny. 


My Sister-in-Law's Elephant Poodle Skirt

My sister-in-law, Suki, loves elephants, so I did an elephant applique for her. I used wool gabardine for the circle skirt. I wanted to use a nicer fabric in case she wanted to make this skirt part of her normal wardrobe! It was my first time using horsehair braid, which is a great detail on hems for a bit of extra flair.


Photo Booth

At the entry to the house, we set up a photobooth, complete with fun signs and props.  The old juke box is an antique we've had in the family for ages. I made the signs with poster board and paint sticks.


My papa's business was making miniature dollhouses when I was growing up, and we have all sorts of wonderful miniatures to this day. He had an entire sock hop vignette, complete with a burger joint, so we decorated the table with it. Our menu consisted of

  • Main meal: Grilled burgers and veggies
  • Dessert: Homemade strawberry cupcakes and rootbeer bourbon floats
  • Movie: Stovetop popcorn and vintage-style candy


The Drive-In

The pièce de résistance of the whole party was the backyard drive-in. My brother found a screen on eBay for fairly cheap, and we borrowed a projector from friends.  We played American Graffiti for the main event and put Pillow Talk on late in the evening. It's a favorite of both of ours.


As I'm sure you can tell from photos, the party was a smashing success. It was a perfect evening of twisting and shouting, soda shop delights, and classic drive-in charm. Happy birthday to me!