Sunday, June 23, 2013

Gingham Picnic Blanket Skirt

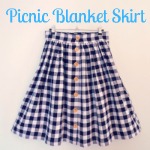
This is Tilly and the Button's Picnic Blanket Skirt. It's a perfect summer sew!


The pattern is very easy to make, and Tilly had great instructions on her blog. It just consists of four rectangles - a back piece, two front pieces, and a waistband. It's a fast sew. I started it after lunch on Saturday and was able to wear it out to dinner that night!

The fabric I picked up while I was in New Orleans visiting a friend recently. It's this great kelly green gingham from Promenade Fine Fabrics. 


The restaurant where we snapped these photos was really neat. It's a new farm-to-table place in Austin called Eden East. It seemed like the perfect occasion for wearing out my new picnic blanket skirt! Thanks for this fun project, Tilly!

Friday, June 21, 2013

My Sewing Room

I find having my own place to sew to be absolutely marvelous. I've spent much of my time sewing on kitchen tables and tucked away in places trying not to make too much of a mess. Now I am in a house where I have my very own sewing room, and it's such a treat. Welcome to my little piece of the world!


I am a bit of a collector and really enjoy curating special pieces to put on shelves and corners of all rooms of my house. These wooden sewing bookends were my latest discovery.

Storage is a seamstresses best friend! I can hide away all sorts of things in that large dresser. I have a few fun items to store smaller notions on my large table, which I use mostly for cutting and piling odds and ends. It's rarely this tidy!


Bobbin storage in a gumball machine!

Needles and pins, 
Needles and pins, 
Sew me a sail to catch me the wind.
-Shel Silverstein 


That's Dolly, my dress form and Oxford Wentworth, my dapper pup. You can usually find Oxford relaxing here while I am burning the midnight oil at the sewing machine. Although often his relaxing is more like moping as he prefers to be on my lap at all times.


I stumbled upon letter press drawers one day on Etsy and instantly realized it would be perfect for thread storage. On top, I have miniature sewing machines. My Papa owned a miniature dollhouse business and these were from his store. The embroidery was done by me.

There you have it! I had to resist the urge to walk you through knick knack by knick knack and describe to you it's origins as well as photograph every nook and cranny of the room. There's so many special family treasures I have scattered throughout. I hope you enjoyed this little tour of my sewing room!


Tuesday, June 18, 2013

1930s Hawaiian Playsuit

Is it summer where you are yet? It was 101 degrees here in Austin yesterday, so I find this 1935 playsuit to be quite apropos for the weather! I will confess to you that I actually sewed this playsuit last fall in anticipation of spending Christmas in Maui. That's why my picture is so exotic!


The pattern is from Eva Dress, a company I quite like for reproduction vintage patterns. I got the fabric shipped from Hawaii because I was determined it be authentic for my trip.

If you click through to that link, you will also discover that there is a giant picture of me on the product page there! I didn't even realize that until I was looking up the link for this post.


My Cattywampus Built-In Bra Cups

Coworkers, look away! I'm going to talk about my unmentionables.

It's important to me that the things I sew are functional. So I decided to sew built-in bra cups to make this playsuit something I could comfortably wear. I had never done that before, though, so it took a bit of internet investigation and exploration on my muslin.

I found a tutorial on sewing built-in bra cups with these basic steps:
1. Place the bra cups on the pattern where your bust will be.
2. Place them 1 1/2 in apart (for C cup or larger).
3. Zig Zag stitch and cut away the excess.

Sounds simple enough, right? Well I botched up at #1.

See what's wrong? The rounded part should be at the bottom, instead of at a side tilt. 

How Did It Go Wrong? 

See where the arrow is on the picture below? I had thought this piece gathered and then twisted. I was right, but my direction was wrong. I gathered and twisted UP towards the neck strap. This resulted in the bottom band rising up towards my bust. It wasn't flattering. I also accounted for way too much twist.

What I needed to do was twist DOWN, which instead tilted the neck strap. That works better anyway because I needed the neck strap to go out and around my neck, not straight up and down as you see in the picture below.

The pattern piece with the area I had to gather and twist marked with an arrow.

Does that make sense? To be honest, it's still hazy to me. I did a lot of on the fly last minute adjustments to make this top work in spite of the cattywampus placement of the bust cups I had already stitched down.

What I Would Have Done Differently

1. I would have been a lot more attentive about placement when I did the muslin! I didn't want to sew down the cups and waste a set on the muslin, so I pinned them down and did some eyeballing. For something so new to me, it would have been worth it to spend the couple of extra dollars to get it right. 
2. I would have lined the cups. The white against the black floral fabric is such a stark contrast! 
3. I would have picked different cups. These are very flimsy and don't provide as much support as I'd like. Dixie DIY suggests ones from Sew Sassy in her swimsuit sew along.  

Overall though, I'm still glad I sewed them in and I learned a lot. It was a good first foray into lingerie sewing at any rate. I also find this playsuit to be just darling, and have enjoyed wearing the shorts by themselves with a blouse. I hope you are all staying cool in this heat! 

Friday, June 14, 2013

Now Showing, The Great Drapo!

Better known as Alphonse BergĂ©  The Great Drapo or The Lightning Dressmaker appeared in the 1940 World's Fair and demonstrated how he could make a dress in 20 seconds. He whips around girls, just draping and pinning, and in the end you see fabulous daytime and evening wear.


Can't get enough of The Great Drapo? Read an article on him from Life Magazine: http://
bit.ly/ZPbI1c

Happy weekend sewing everyone!

Wednesday, June 12, 2013

Lessons in Creating from Julia Child

I just finished reading My Life in France by Julia Child and Alex Prud'Homme. It starts in 1948 when Julia and her husband Paul lived in France and she was first introduced to French food and cooking.

Here's a few tips that I learned from the illustrious French chef that really resonated with me as a seamstress.


Don't Be Afraid of Failure in the Kitchen (or Sewing Room)

Gollies, sometimes it's hard not to get down on yourself when you totally botch something up. I've watched really experienced sewers make mistakes and get out their seam ripper. Of course, I'm going to, too!

Julia says, "One of the secrets, and pleasures, of cooking is to learn to correct something if it goes awry; and one of the lessons is to grin and bear it if it cannot be fixed."

When I forgot to stay stitch on the Colette Taffy and ended up with a huge neckline, I had to improvise. I learned a lot by figuring out how to fix the problem, and I'm sure it's not the only time I will make that blunder. 

No Excuses! No Apologies! 

Julia told a story of cooking eggs benedict for a friend just after she had started at Le Cordon Bleu. The hollandaise sauce turned out terribly- gritty and just not good. Yet she insisted that no cook should ever make apologies for a meal gone wrong.


She had three reasons for not apologizing: 

1. Your friends are forced to make you feel better. They already have to eat the bad food! Don't make them do more.
2. It may make them recognize flaws they didn't already notice. She says, "Usually one's cooking is better than one thinks it is." 
3. The focus should be on learning from your mistakes, rather than the failure.

I am all to apt to finish a garment and quickly point out the flaws. Getting in the doldrums over my lack of skills is pointless; recognizing these flaws so I can improve from them in the future is worthwhile.

Remember What Matters

I was amazed to discover the amount of time and energy Julia poured into creating Mastering the Art of French Cooking. She worked tirelessly for NINE YEARS on this one book alone. Sometimes she wanted to forgo plans with friends or family to keep working on something she was so passionate about.

She didn't,though. She says,“Remember, 'No one's more important than people'! In other words, friendship is the most important thing--not career or housework, or one's fatigue--and it needs to be tended and nurtured.”


I am too often tempted to hermit away in my sewing room and come out triumphantly several garments later. That would be the real mistake!

I hope you enjoyed these little lessons from a truly fearless and delightful woman. Bon appettit and happy sewing!

Wednesday, June 5, 2013

Atomic Burst 3/4 Circle Skirt

This is one of two circle skirts that got their inspiration from a Finnish blogger I follow. I am pretty obsessed with the fabric on this skirt. It's a cotton created by Michael Miller and has a great 1950s retro vibe.


Can you see the fabric-covered button I used for the closure? 

You'd make this excited face, too, if you had this fabric to sew with. 


Drafting a 3/4 Circle Skirt 

I opted to go with a 3/4 circle skirt instead of a full one because the width of the fabric wouldn't quite stretch to a full circle skirt. I really enjoy the look in the end. I had been using instructions from Gertie's New Book for Better Sewing to draft the full circle skirts I created before (here and here). 

This time, I stumbled upon a circle skirt drafting calculator from another blogger. It's a worksheet you can download and used to calculator whatever size circle skirt you are wanting to create. I found it extremely helpful and accurate. 

Just one more circle skirt to sew from my fabric stash, and then perhaps I'll take a break for a bit! Although I can't make any promises...

Sunday, June 2, 2013

How I Started Sewing

Today I have some throwback finished projects for you! I hope you enjoy hearing how I got started sewing and will share in comments below how you got your start.

I've been dabbling in sewing since I was a tiny tot. I loved to embroider all manner of things when I was little. My grandma took care of us during the day and sometimes she would let me stitch things on her machine, too.  My interest in vintage started equally as young, so it's a happy combination for me.

But I didn't really get into sewing until I was 12-years-old. It all begin with a pair of pajama pants. These pajama pants in fact...

Behold! The first garment I ever sewed. 
  
I remember cutting out the pattern and not understanding how it was supposed to fit together, so I raced upstairs to my bedroom and got out a pair of pajama pants to inspect. I was hooked from that moment on. 

The Pajama Pants Years

After that, I went through a serious pajama pant craze that lasted well through high school. I'm pretty sure every friend and family member received a pair of pajama pants from me, and some were truly atrocious looking. I started getting fancy and embroidering messages inside the waistband of the pants, too, like, "Happy Birthday!" I sewed matching pajama pants for my family.

My parents and I in Radio Flyer-print pajama pants I made. I don't know how my brother managed to be spared here. 

Sew All the Things!

After that, I started sewing pretty much everything. Home decor things like throw pillows, quilts (although I didn't yet understand the proper way to quilt), appliqued pillow cases, purses galore, novelty items there were jokes between friends, and eventually clothes I actually wore out in public.


A skirt I made out of t-shirts. I'm making my first trip to college here!

I did a lot of experimenting and winging it.  I am completely self-taught, and only in the past few years have started devouring sewing books and getting engaged in the online sewing community to get more skilled in a craft I love very much. I am still hooked!

Here's to many more happy years of sewing!