Thursday, February 27, 2014

Sewing Inspiration: Glamour 75th Anniversary

Next month, Glamour magazine celebrates their 75th anniversary. It inspired me to take a look back at old Glamour covers from the decades I love. It turned out to be a wonderful source for sewing ideas as we transition from winter to spring! Here are a few of my favorites with ideas on how you could recreate them.

Bow Detail from May 1943 

Aren't these bows just darling? I love that the detail at the neckline is mimicked at the pockets.

Source

Recreate this look: 

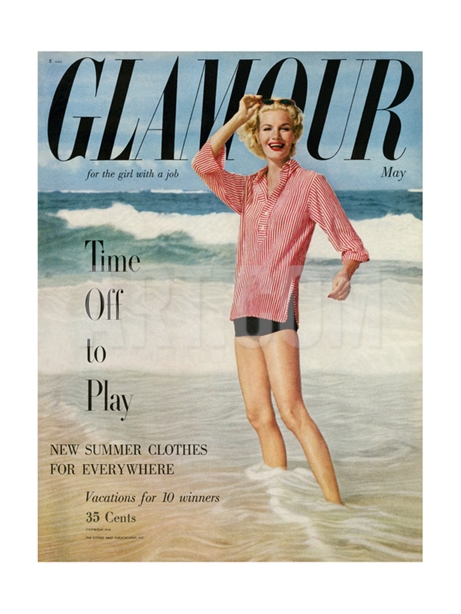
Beachside Tunic from May 1954

Gollies, don't you just want to go wherever she is? I'm sure that's especially the case for all of you still caught in throes of winter. This model is described as wearing a "candy-striped tunic" over black swimsuit. 
Source

Recreate this Look 

Blue Suit from February 1960

I love everything about this photo. All this matchy-matchyness is just perfection. 
Source

Recreate this Look 

Wasn't that fun?! I could do this for ages! Congratulations Glamour on 75 wonderful years of fashion! 

Tuesday, February 25, 2014

Shift Dress Sew Along: Your Completed Dresses

Here they are! Your dresses made from our Shift Dress Sew Along. Let the parade begin! And keep scrolling, there's a fun little surprise at the end.


Many thanks to all of you for participating in the sew along. It was such fun, and your dresses are just lovely! 

Quotes from You Come to Life!

We talked a bit about sewing and body image throughout the sew along, and there were some truly sensational comments and quotes from your posts. I loved them so much, I worked with my designer friend to come up with little badges adapted from my favorites! Aren't they grand?! It makes me so happy that they're on ric rac packaging because I love the idea that good self esteem is like a notion, a tool in your sewing arsenal. Plus, I love ric rac.

So if your sew along badge is feeling lonely, or you just feel like sharing the love of embracing your measurements through sewing, please share them!

See more badge sizes

I have to give you the full quote on the last one because it was so good. It came from Julia (in the polka dot above), who sewed her first dress for herself with the Shift Dress Sew Along, "The best thing for body image wibbles is making your own clothes. This dress will fit ME, there is no question of me slimming down for it. Clothes. Know your place." Hear hear! 


Wednesday, February 19, 2014

Winter Hallettsville Shirtwaist

More plaid and wool! This is a shirtwaist pattern I drafted myself and named The Hallettsville dress. I was sorely lacking in good winter dresses, and I'm glad I've managed to sew a few this season. I can already tell this dress will be worn to pieces.
I made two modifications to the pattern from my last version: 
  1. I lowered the neckline 1/4" and made it a bit more round. 
  2. I did a 1/4" FBA and then took in the waist 1/4". I had a bit of pulling at the bust on the last version, but didn't need any extra ease in the waist.
I like both of these modifications, so I'll be keeping them for future versions.
The fabric is a lovely wool suiting I had in my stash from Denver Fabrics. It's got a really nice weight to it, and the colors are just the best. 

Matching Plaid at the Sleeves

You might recall from my Hawthorn post, I started a second wool dress to figure out some of my matching conundrums. This is it! I was really pleased with the matching all around. In particular, I wanted to focus on the sleeves this time. One turned out better than the other, but I'm getting better! 


From what I've found, there's two ways you can go about matching plaid at sleeves. I tried both, and I definitely liked the second better than the first. 

Method 1: Match With a Muslin Sleeve

I started by sewing in a muslin sleeve and drawing lines with a sharpie where the plaid needed to match. I am an extremely visual person, and I thought I would like doing it this way because I could really see where things needed to go. 


Turns out, I don't care for this method. First off, you've got to draw lines all the way across, not just the measly marks I made. Because the curve is much steeper on the armscye than on the sleeve where my plaid hit, the plaid didn't actually match at the seam. I figured out that what I really needed to do was create the illusion of matching when my arm was down. To do that with this method, you're kind of eyeballing it and drawing lines.

Second off, this takes a lot of time! I cut a sleeve out of muslin, basted it in, and then had to rip it out when I was finished. Ain't nobody got time for that. 

Method 2: Match as You Cut 

Ding ding ding ding! This was the winner! In this method, you match the plaid as you are cutting at the underarm point. 


This was sooo much better. I feel like it's much more accurate, and it was faster to do. So give that a try next time you're matching plaid at your sleeves! Or, forgo it all together and cut your sleeves on the bias! 

Now I'm moving on to spring sewing, so no more plaid wool for me. Although there will likely be gingham in my near future, so I can continue to polish my matching skills. 

And for the road, here's the Hallettsville with my newly knitted sweater! It goes with everything!! Don't forget to enter the giveaway for the Craftsy class. You only have until 2/24!

Thursday, February 13, 2014

Shifting Bust Darts for Plaid or Stripes

This tutorial will show the Colette Hawthorn pattern as an example, but this would apply to any bust dart that you need to shift for plaid or stripes.

Recognizing It and Why it Matters

The darts on the Colette Hawthorn are not on grain, so it looks slightly tilted. You can see that in the outline of the pattern here:


When you sew this dart with a stripe or a plaid, the lines won't match afterwards. Here you can see what happens to the plaid when the dart is off grain (left) vs. on grain (right). 

Dart on the left is original to pattern, dart on right is with shifting.

Doesn't it look so much nicer lined up? Especially right under your bust.

From Start to Finish

Here's a gif that shows you all the steps together that we'll be going through: 

Step by Step 

  1. First, you need to make sure that the apex is in the right spot for you. When we shift the dart, we'll make sure it continues to point at the apex, so use your muslin or pattern tissue fitting to make sure it's good to go. 
  2. Draw a box around the dart. Cut it out. 
  3. Shift the box until the dart is vertically straight. Tape it down, filling in any gaps with paper. Connect the cutting lines at the waist seam with pencil (or pen if you're daring!)
That's it! It's fairly simple to do, and worth it for the visual appeal of having your plaid/stripes line up!

In my next post, I'll be talking about my experiments with different methods for matching plaid at the sleeves on another plaid wool dress I'm sewing (I just can't get enough!). If you're looking for a more general tutorial on how to match plaid, I recommend Lladybird's tutorial on matching plaid like a boss. 

Wednesday, February 12, 2014

Giveaway! My First Sweater Class from Craftsy

A few of you mentioned that you'd like to try the My First Sweater class from Craftsy that I used to knit my first sweater. Craftsy has been kind enough to offer a giveaway! It's open until February 24.

Enter Giveaway


Here are the fancy photos of the sweater, but below is me the minute after I finished knitting when I rushed to try it on. It was such a thrill!!  If you have the knitting itch but are battling your needles, I'd definitely recommend this class! It helped me tremendously.


Good luck! 

Tuesday, February 11, 2014

Wool Plaid Colette Hawthorn

My latest make is a Hawthorn by Colette Patterns. The fabric is from my stash, a plaid wool I purchased from High Fashion Fabrics in Houston, TX. It's ideal for winter!

I confess I was unsure about the Hawthorn when it first released, mostly because the collar seemed a little odd to me. Like most of us in the sewing community, I adore Colette Patterns and decided to give it a go anyway. I'm so glad that I did! The pattern came together really nicely with minimal changes, and it's a very comfortable and becoming dress. I even really like the collar now. 


The Case of the Mismatched Plaid

The pattern gave me no trouble, but the plaid is an entirely different story. All of my seams lined up grandly, except for one dastardly side of the skirt. I cursed the heavens and simultaneously scratched my head in confusion when this happened. I couldn't understand what went wrong. A mystery!

Huzzah!

$#!@*#!...

I was determined to get to the bottom of it, so I started work on another plaid wool dress. What's that you say? I'm daft? There was a mystery to solve! As any good amateur sleuth knows, you must recreate the scene of the crime to get the juices flowing.

This Gum Shoe Cracks the Case!

I realized in working on the second dress that I had paid very careful attention to my fabric being on the straight grain and my center seams matching. I neglected to pay attention to the cross grain. I didn't keep it straight as I went, and I ended up with one side that was wonky. A good lesson that is easily correctable on future garments!

I'm also still working on plaid matching with sleeves. I went with vertical instead of horizontal for the dominant stripe to break things up a bit. I hit it dead on in some places, and not so much in others. I know from lots of investigative work on the internet that not everything will match at a sleeve, but I still haven't quite sorted out what can!

Shifting the Dart for Plaid Matching: Tutorial Coming Soon

The bust darts on the Hawthorn are slightly angled. This is jolly good, except for when you have a stripe or a plaid. It will make your line cattywampus at your bust. 

I didn't want this, so I shifted the dart to be perpendicular, making sure it stayed pointed at my bust apex. Here's the difference.

Dart on the left is original to pattern, dart on right is with shifting.

See? The dart on the left causes the plaid lines to not match up, whereas the one on the right keeps things all lined up. I'll post up a tutorial on Thursday to show you how I did that. 

Thursday, February 6, 2014

My First Knitted Sweater!

I KNIT A SWEATER!! While we were all sewing along, I was quietly click-clacking my needles in the background. It took me a month from start to finish, but I have been trying in vain for a full year to knit a sweater. I'm so glad I muddled through, because I am completely addicted to knitting now!
Here is it unbuttoned… I used buttons from the 1950s that I found on Etsy. I had to give it a vintage flair! 
And buttoned again… I just can't get enough! This sweater is so tremendously cozy, and easily my favorite that I've ever owned. It just makes me grin!  
The pattern is from Craftsy's aptly named "My First Sweater" class, and has a lovely eyelet detail at the sleeve that is created by doing yarn overs. It's knitted in five separate pieces and then seamed. The button band and neckband are picked up after and knitted. Now I am itching to give knitting in the round a go. Many say it's much easier as you can fit as you go. Thankfully, I didn't have to make a single fit change to this cardigan. I think it would have really overwhelmed me!

I had also never blocked before, which was much more intense than I anticipated! I felt like I was conducting a science experiment in my kitchen. I blocked each of the pieces before seaming them together. I found that was much easier to seam it that way.
After sewing for so long, I had forgotten what it was like to be a beginner. It's hard work! The extra guidance from the Craftsy class was what I needed to finally get past the beginner blues and get going. Amy Ross teaches the class, and she was great. She was very fast at responding to questions, and I was surprised by the amount of interaction I was able to have with her in the class. 

My only complaint was that I felt the class left off a lot of the information a beginner would likely need. For example, I didn't know you can pick up a dropped stitch with a crochet hook, so I spent one evening ripping out everything I had knitted that day to pick up one stitch that had lost its way! Then I had a calamity of errors trying to get going again. If you look real close, you'll see a bit of bumpiness in the middle back, where I had those problems. I also had never changed needle sizes or added a new ball of yarn, but Amy was great at answering questions.
Prior to this, I had knitted scarves and one baby blanket. Similar to my experience with sewing, my eyes didn't light up with excitement until I worked on knitting a garment. I also love that it's portable. It was great over the holidays to take this project with me to family while we were all lazing about after big meals. It's wonderful to be able to create even when you don't feel like doing much of anything! 

See more construction details and friend me on Ravelry!

*Update* Craftsy has kindly offered a giveaway to my readers for the "My First Sweater" class! So look for information soon on how to enter!

Tuesday, February 4, 2014

Shift Dress Sew Along: My Completed Dress

Here she is! You've seen the fabric up close and personal over the last few weeks, and now you can see it in its full glory. It's Anna Maria Horner's "Garden Social Climber."


When cutting, I tried to make sure the dominant part of the print was running along the center of my body for visual balance. I was a bit more successful at the back than the front at doing this. There are just so many seams at the front! 


I hope you've come to love the pattern as much as I have as we've been sewing. It's such an easy dress to put on and feel sensational in. It was particularly warm on the day we snapped these photos, but I've been wearing it this winter with pink tights and a white cardigan. It's been great fun. 

Why Include Plus Sizes? 

As we're wrapping up, I want to take a moment and share with you why I felt it was important to include plus-size sewists in the Shift Dress Sew Along. I haven't seen very many sew alongs that do, and the more I looked around, the more I saw there's a lack a fashionable plus-size patterns and not a lot on how to modify ones that aren't to fit you. I was tickled pink when Carolyn agreed to create the tutorial for our sew along.

I get a little teary eyed to down right emotional if I stop to think long enough about what sewing really means to me. I've been sewing since I was 12, and it has gotten me through some truly terrible times and lots of dress sizes. It has also helped me to come to love and appreciate my body just as it is, and strive to flatter my figure and celebrate it rather than hide it away. Every woman deserves to feel that, and if sewing can help make that happen, I'll create whatever tutorials you think you need to get there. And if I don't know, we can learn together!

That being said, please let me know what you think of the sew along! Could I do anything to improve the tutorials, or were there any others you'd like to see? What did you think of the pace? You can simply leave a comment with your feedback or email me.

Upload Your Dress by Feb 24

I would love to share everyone's dresses! Please upload them to the Flickr Pool or leave me a link in the comments by February 24. That way you get a bit more time to finish up, and I can post a parade at the end of the month!