Next week in the Shift Dress Sew Along, we talk plus size adjustments and get started sewing! It's gonna be fun!
Sunday, January 12, 2014
My Interview on Jennifer Lauren Vintage
Jen of Jennifer Lauren Vintage is doing a series of interviews with sewing bloggers, and today my interview is up! You can hear all about how I got into sewing, my greatest sewing accomplishments and failures, and what I get up to when I'm not behind my sewing machine. See the interview.
Thursday, January 9, 2014
Shift Dress Sew Along: Full Bust Adjustment
A common fit adjustment is a full bust adjustment (FBA). Even if you've done an FBA before, you might be a little stumped on how to do it for Simplicity 3833. It's tricky because the dart is made up of two pieces. Have no fear! Today I will show you how, with animated gifs!
Here it is in action:
How do I know I need an FBA?
The major pattern companies like Simplicity design for a B-cup size. They also tend to have a considerable amount of ease (extra space between your body and fabric). Since this isn't a very fitted dress, you may end up not needing one. This is why a muslin is helpful! You can check it before you sew with your fashion fabric.
Here's what to look for:
- Tightness across the chest. You will see horizontal wrinkles when you need more width and vertical wrinkles when you need more length.
- A gaping neckline. This can be a sign that you're full-busted and have selected a size that's too large for you. Remember it's best to select a size from your high-bust adjustment, which is a better indicator of your rib cage size instead of your busty-ness.
- Where the dart points and ends. It should be pointing at your bust apex (nipple) but end before it. It will usually end about 1" away from the bust apex, but it can be as much as 3" if you're very full-busted.
Supplies You'll Need
Here's what you'll need to make the adjustment:
- French curve ruler
- Straight-edge ruler
- Tracing paper. Here's what I use.
- Tape
- Paper scissors
- Pencil
Making the FBA: Bodice Front
To begin, mark lines on your pattern pieces like the ones show in red below. The dot is your bust apex. This isn't marked on your pattern, so you'll need to find it for you. An easy way to do it is to mark it on the muslin, measure the distance from the dart tip to your apex, and then mark the same on the pattern.
Cut along the lines. Then spread apart the bodice. Then distance you spread should either be:
- The difference between your full bust measurement and the measurement that's on the pattern divided by 2 (since you have 2 boobs!).
- The distance needed to make the center front of your pattern match center front on you. You can hold you pattern piece up to you to check this. Remember it includes seam allowances when lining it up to your shoulder and side.
- The amount of space you have when you slash your muslin to allow extra room (see photos of this method).
Here it is in action:
Tape the new spread bodice onto tracing paper. Use the straight-edge ruler to draw the gap at center front. Use the french curve ruler to connect the gap at bottom of the bodice.
Making the FBA: Bodice Bottom
Now, don't forget we have a second pattern piece that composes part of our dart. We need to modify that pattern piece to match the changes we've made.
Draw a line on the bottom pattern piece to match the vertical line you drew on piece 1.
Cut along that line. Spread the needed amount to match the amount at the top of the bodice.
Tape extra tracing paper to fill the gap. Use the french curve to connect the lines at bottom and top.
Ta da! You're done with the FBA! If you're doing a small bust adjustment (SBA), you'll follow the exact same steps except you'll be collapsing instead of spreading.
*Update* Some folks are asking if this also increases the waist and hip. Yes, it does. It's done that way so you're grainline stays intact and things still sit right. If that's way too much for you, I would take it in at the side seams now at the waist and the hips if it's too big there, too.
Have other fit adjustments you need?
Upload your photos to the Flickr group, and I can help you sort it out!
Tuesday, January 7, 2014
Shift Dress Sew Along: Pointers for Making a Muslin
Before we dive into muslin making, I have two quick notes:
- Joann's is having a Simplicity pattern sale January 12! A reader got a tip from a store clerk and was kind enough to share it with us. So if you don't have a pattern yet, now's the time!
- If you're sewing the original pattern, Simplicity 8498, this post details the differences between the reprint and original 1960s pattern. It might be helpful to keep in mind while we're talking about fit.
What is a Muslin?
It's a test-run of the garment you use to get out any fitting kinks. It's named that because you usually use muslin, an inexpensive cotton. I buy mine by the bolt at Joann's when there are good sales.
Why Make a Muslin?
So you'll wear the garment in the end! For a very long time, I didn't know what muslins were or why they were important. I had so many handmade dresses that I never wore because they were ill-fitting.
In particular, I can remember one dress I made in college that I wore to an event on a boat. The bust was incredibly ill-fitting and the shoulders needed to be taken in, things I didn't know how to do. I spent the entire evening wearing a life vest to cover it up! That dress never saw the light of day again, which was a crying shame after all the work I put into it. A muslin would have saved me!
How to Make a Muslin
You don't need to worry about any finishes or things that are on the inside of the garment, so it's much quicker to assemble. Even though it's a quick version of the garment, you should still mind seam allowances and accurately stitch darts. Otherwise you won't really be able to tell the fit.
Here's the steps you'll follow to make the muslin:
- Cut out pieces 1, 2, and 3 from the pattern (bodice front and back) in muslin or similar material. Transfer the darts and clip the notches.
- Sew at 5/8" along the neckline and armholes.
- Sew darts. Press.
- Assemble bodice front. Sew bodice front to back at shoulder and side seams. You can use a basting stitch, which is easier to rip if you need adjustments. Press open seams.
- Clip every inch or so into the neckline and armhole up to your stitch line. This will let you see where the seam will lie, and give you room to get in and out of the dress.
- Either using your dress form or getting a friend to help you by pinning the back, try on your muslin.
Determine Fit Alterations
Is the dress comfortable? Move around, sit down, act like you would on a normal day to get a feel for it. Do you see any fabric pulling, or excess fabric pooling?
If you're looking for a resource for identifying and altering clothes for fit, my favorite book is Fit for Real People. See how I use it.
Helping Each Other Fit
Our next two posts will be on alterations - I will show you how to do a full bust adjustment for this pattern (and how to know if you need it), and Carolyn from Diary of a Sewing Fanatic will show you what to do if you are modifying the pattern for a plus size.
Once you've got a muslin done, upload it to the Flickr pool, and we can all help each other spot fitting issues and get them fixed!
Thursday, January 2, 2014
Shift Dress Sew Along: Selecting and Preparing Fabric
Today we'll be covering fabric and all things therein! I've never met a seamstress that didn't have a fabric stash. It's so much fun to consider all the possibilities at this early stage!
Recommended Fabric
In general, you're looking for a lightweight fabric like cotton, linen, or wool gabardine. There's a long list of options at the back of the pattern envelope to choose from. Colette patterns has a great series on understanding fabric types if you need help deciphering the options.
Wrinkles. Linen is a recommended fabric, and it wrinkles a lot. I still like sewing with it, so I've done Simplicity 3833 out of it. If that bothers you, select a different fabric. Generally speaking, anything natural will wrinkle more than synthetic fabrics like polyester.
Season. Are you sewing this dress for a particular season? I live in Texas, so I can get away with something as light as a cotton voile almost year round. If you're going for winter, think of using a lightweight wool like wool gabardine.
Keep in Mind
Print placement. You have a seam under your bust, as well as one down the center front. You need to buy extra fabric to get the placement right. Typically you want to put the dominant part of the print down your center front and match it, especially with something like plaid where it's noticeable.Wrinkles. Linen is a recommended fabric, and it wrinkles a lot. I still like sewing with it, so I've done Simplicity 3833 out of it. If that bothers you, select a different fabric. Generally speaking, anything natural will wrinkle more than synthetic fabrics like polyester.
Season. Are you sewing this dress for a particular season? I live in Texas, so I can get away with something as light as a cotton voile almost year round. If you're going for winter, think of using a lightweight wool like wool gabardine.
Some Options
I've highlighted some options below for you. Just click through to see the source/buy yourself some yardage!
![]() |
| Jade Wool Gabardine on Etsy |
![]() |
| Mustard Linen from Hart's Fabric |
![]() |
| Dot Plaid Cotton on Purl Soho |
![]() |
| Blooms Cotton Voile on Mood |
| Swell Hues Cotton on Spoonflower |
![]() |
| Gold Brocade from Joann's |
Before You Cut
Tilly from Tilly and the Buttons has a wonderful tutorial that covers everything you need to know and do before you cut, including pretreating (wash it like you will after sewn!), and how to place fabric on grain. Before you cut tutorial from Tilly and the Buttons.
I only have one extra tip that's specific to what we'll be doing - add an extra 1/8" seam allowance at the center back seam if you would like to use the zipper method I am going to show you. You can do it with 5/8", but that extra 1/8" helps.
Have any of you purchased fabric already or have something in mind? I'd love to see it! Share it with us in the Flickr pool!
Tuesday, December 31, 2013
Shift Dress Sew Along: Inspiration
Our inspiration for the Shift Dress Sew Along comes from Catherine of Sewing the 60s. I love the creativity she expresses with each shift she sews, so I knew she'd be a perfect person for this post! Enjoy!
Hello everyone! It's Catherine here from Sewingthe60s - a blog dedicated to sewing and all things 60s especially the fashion! The wonderful Lauren of Rosie Wednesday has kindly invited me to join in her shift dress sew along and also to shed some light on this simple yet striking style of dress.
At the beginning of the decade shirtwaist and 'wiggle' dresses were the styles most worn by women, but as the 60s drew on, waistlines became looser and looser until around 1963 when shift dress patterns became available to home sewers. This was largely through the work of designers like Mary Quant and Jean Muir.
Shift dresses were initially popular due to their simplicity - some darts around the bust and shoulders are all that is needed to fit the shape. The dress then hangs from the shoulders down to just above the knees. The pattern itself is so simple that it's very easy to modify and add to it. Shift dresses are a favourite still today, perhaps due to their simple shape and wearability across all body types!
I own a few shift dress patterns and have one that I've modified enough that it always fits perfectly! Here are some examples:
Be sure the check out the shift dress inspiration board on Pinterest for more ideas!
Hello everyone! It's Catherine here from Sewingthe60s - a blog dedicated to sewing and all things 60s especially the fashion! The wonderful Lauren of Rosie Wednesday has kindly invited me to join in her shift dress sew along and also to shed some light on this simple yet striking style of dress.
At the beginning of the decade shirtwaist and 'wiggle' dresses were the styles most worn by women, but as the 60s drew on, waistlines became looser and looser until around 1963 when shift dress patterns became available to home sewers. This was largely through the work of designers like Mary Quant and Jean Muir.
![]() |
| Mary Quant in one of her own shift dress designs |
Celia Birtwell, textile designer, and Cathy McGowan, British journalist, in Biba shift dresses
They, among others, continued to drive its simple beauty by using different colours, patterned fabrics, adding applique shapes and ruffles and changing up the sleeve style. By the late 60s the shift dress was still popular with most women especially those who worked, as the style is modest while still allowing for personalization with scarves, brooches and jackets.
Shift dresses were initially popular due to their simplicity - some darts around the bust and shoulders are all that is needed to fit the shape. The dress then hangs from the shoulders down to just above the knees. The pattern itself is so simple that it's very easy to modify and add to it. Shift dresses are a favourite still today, perhaps due to their simple shape and wearability across all body types!
Be sure the check out the shift dress inspiration board on Pinterest for more ideas!
Friday, December 27, 2013
Making the Marfa Dress
A reader suggested I share a bit of the process getting to The Marfa Dress, and I thought that sounded like a splendid idea! I'll focus mostly on the darts at the neckline, as they're the focal point of the dress. I only wish you could see them a little better in the photos!
Angie from Sew I Thought actually made up a beautiful version of the dress on the right for Sew for Victory.
The second inspiration was from an illustration from Make Your Own Dress Patterns by Adele Margolis.
I loved the idea of darts coming off the neckline, and experimenting a bit with 1940s styles. Since my first design was a shirtwaist dress, and a good everyday staple, I also wanted something a little fancier for my second design.
I hope you all had a smashing Christmas! Next week, we get started on the Shift Dress Sew Along with a bit of inspiration!
Inspiration
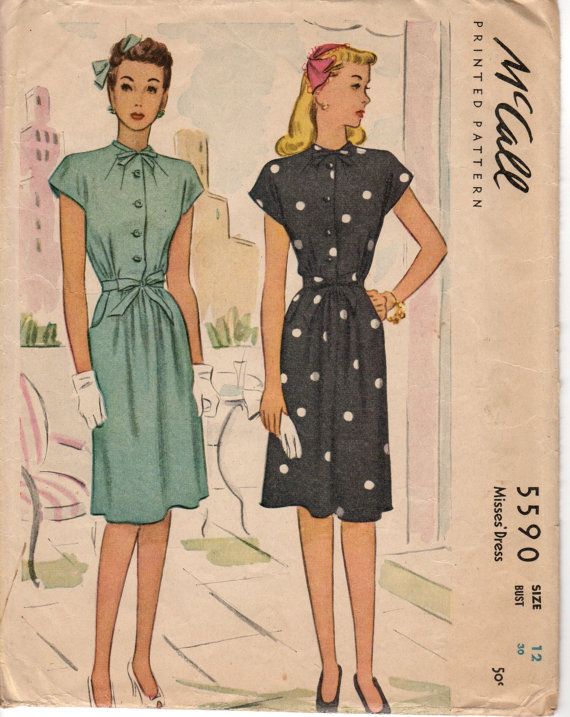
I scoured the web for tons of images and ideas, but the main inspiration for this dress comes down to just 2. The first is from a 1940s vintage pattern, McCalls 5590. It has 4 darts on the neckline.
![]() |
| Source |
![]() |
| Source |
![]() |
| Fig 65 |
I loved the idea of darts coming off the neckline, and experimenting a bit with 1940s styles. Since my first design was a shirtwaist dress, and a good everyday staple, I also wanted something a little fancier for my second design.
Manipulating the Darts
I decided that I wanted 6 darts coming off the neckline, and I wanted them all to be of equal length. I also wanted to keep the bodice cut on center front, so my darts would need to be on either side of CF. I began with my bodice sloper, and then moved and separated the dart from the waist up to the neckline. It looks like this from start to finish:
Here are the steps:
- Redraw new dart legs that go all the way to the bust apex.
- Draw 3 points on the neckline where you want the darts to end up.
- Draw lines connecting the tip of the dart to those 3 points.
- Cut out the dart at the waist, and cut along each of the 3 lines.
- Close up the dart at the waist. Evenly distribute the open space across the 3 new darts.
Perfecting the Darts
Now that I had the darts manipulated, I had to figure out the best way to sew them. Typically you move the darts about 1" away from the bust apex, so I started there. Because I had 3 darts, I had a bit of excess fabric that pooled at the end that was more than just adding fullness for my bust. Not very flattering! In the end, I made it work by:
- Moving the darts up 2 1/2" above the bust apex.
- Lessening the angle at the dart tip. I started tapering very close to the tip of the dart about 1/2" before it ended.
I hope you all had a smashing Christmas! Next week, we get started on the Shift Dress Sew Along with a bit of inspiration!
Sunday, December 22, 2013
The Marfa Dress
The Marfa Dress is my second dress design, so named after the small Texas town with mysterious lights. I made it from a beautiful emerald crepe rayon and lined it in grey bemberg. I feel so glamorous in this frock!
I stayed very true to my original sketch of the dress. The dress features:
I hope you all have a very merry Christmas!
Dress Details
- Six darts at the neckline.
- A cap sleeve.
- A very full skirt, great for twirling!
- A lapped zipper.
- Lined bodice.
I also started out with a skirt that was much more a-line. As soon as I tried it on, I said, "FULLER!" So I added 24" of fullness. I'm not kidding around when it comes to a full skirt. How else would I be able to twirl, like so?
I am really proud of my lapped zipper, which is the best I've ever done. I followed a technique I'll be sharing with you in the Shift Dress Sew Along.
The Marfa Dress at My Fashion Show
My pattern making class had a final exhibition/fashion show where we walked the runway and showed off our designs. It was so wonderful, and a bit nerve-wracking!
Here's a video of me walking the catwalk in the Marfa Dress! You'll hear a bit of a secret, that won't be so secret now, about a dream I have in the future. You'll also see me chuckle and make some faces as I'm up on the platform - it was a long time to stand up there and twirl and pose! Except now I see it was only 48 seconds… Hrm.
I hope you all have a very merry Christmas!
Subscribe to:
Posts (Atom)